This tutorial will help you build a beautiful WordPress in 10 minutes, including all the elements you need for your personal website, allowing you to quickly complete the process from website construction to speed optimization and SEO . You don’t need to understand code or have too much web knowledge, just follow the tutorial step by step.
Table of Contents
Preparation before setting up WordPress
You need to make it clear whether you want to use a VPS or an integrated service provider to build WordPress. If you want to use a VPS, I would recommend Vultr . If you want to use an integrated service provider to build wp, I would recommend Siteground .
- The core reasons why I recommend Vultr for VPS: it is cheap, supports Alipay, and is paid by the hour.
- The reason why I recommend Siteground as an integrated service provider: it only costs $36 a year, has stable performance, and has a very low threshold.
I recommend people without programming experience to use Siteground to build their website . Because if you make a mistake in typing a line of code, your website will be ruined. In this tutorial, I will use Siteground to build my website, so I will need to buy the cheapest package of $36 from Siteground for my personal website.
The reasons why I prefer Siteground over VPS are:
- Siteground can automatically configure the domain name mailbox, so there will be no problem sending emails from within your WordPress.
- No need to set up php.ini or .htaccess files;
- Automatically back up your WordPress periodically to prevent data loss;
- There is a supporting site tool that can help novices reset the administrator account password.
- The threshold is lower than that of VPS, suitable for beginners;
- Cheaper than VPS, a lot.
If you want to build it in a VPS, here is a 1-minute build tutorial . The 1-click script will automatically build it and give you a flying WordPress build experience.

WORDPRESS
1-minute tutorial on setting up WordPress on a VPS
This tutorial teaches you how to build WordPress in a VPS within 1 minute. You don’t need a strong programming background to complete it well.
Tutorial on Building WordPress
Here, I will use one of my idle domain names as a demonstration, build a new WordPress, and install the necessary themes, SEO plug-ins, and speed optimization plug-ins.
Step 1: Buy a domain name
Before you start building, you need to buy a domain name. I recommend using Alibaba Cloud’s HiChina, which is where I bought it. My domain names are vps101.cn and jihuicafe.com.
If you are buying a domain name for the first time, open HiChina , search for the domain name you like , and then pay with Alipay .
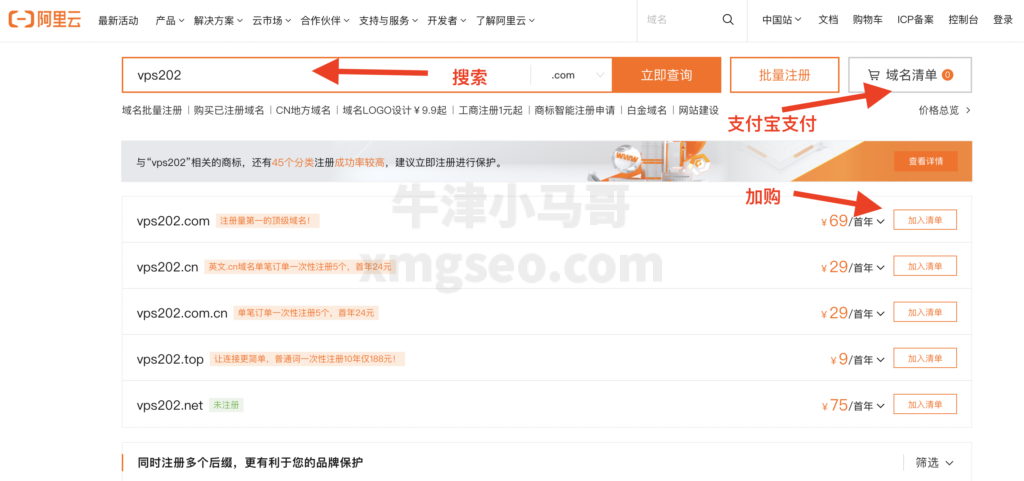
If you need very hands-on help buying a domain name, I have a very detailed tutorial on how to buy a domain name on Alibaba Cloud that you can check out.
Step 2: Purchase a server
We will use Siteground to build it. In my tutorial below, I have described how to purchase a hosting server in Siteground .

WORDPRESS
How to build WordPress with Siteground
This tutorial will show you how to quickly build WordPress with Siteground. It will take you about 5 minutes to complete.
If you don’t plan to use siteground to build and still insist on using VPS , I remind you again that you can watch my tutorial on building WP on VPS in 1 minute .
Below you can see the process of me purchasing the siteground package.
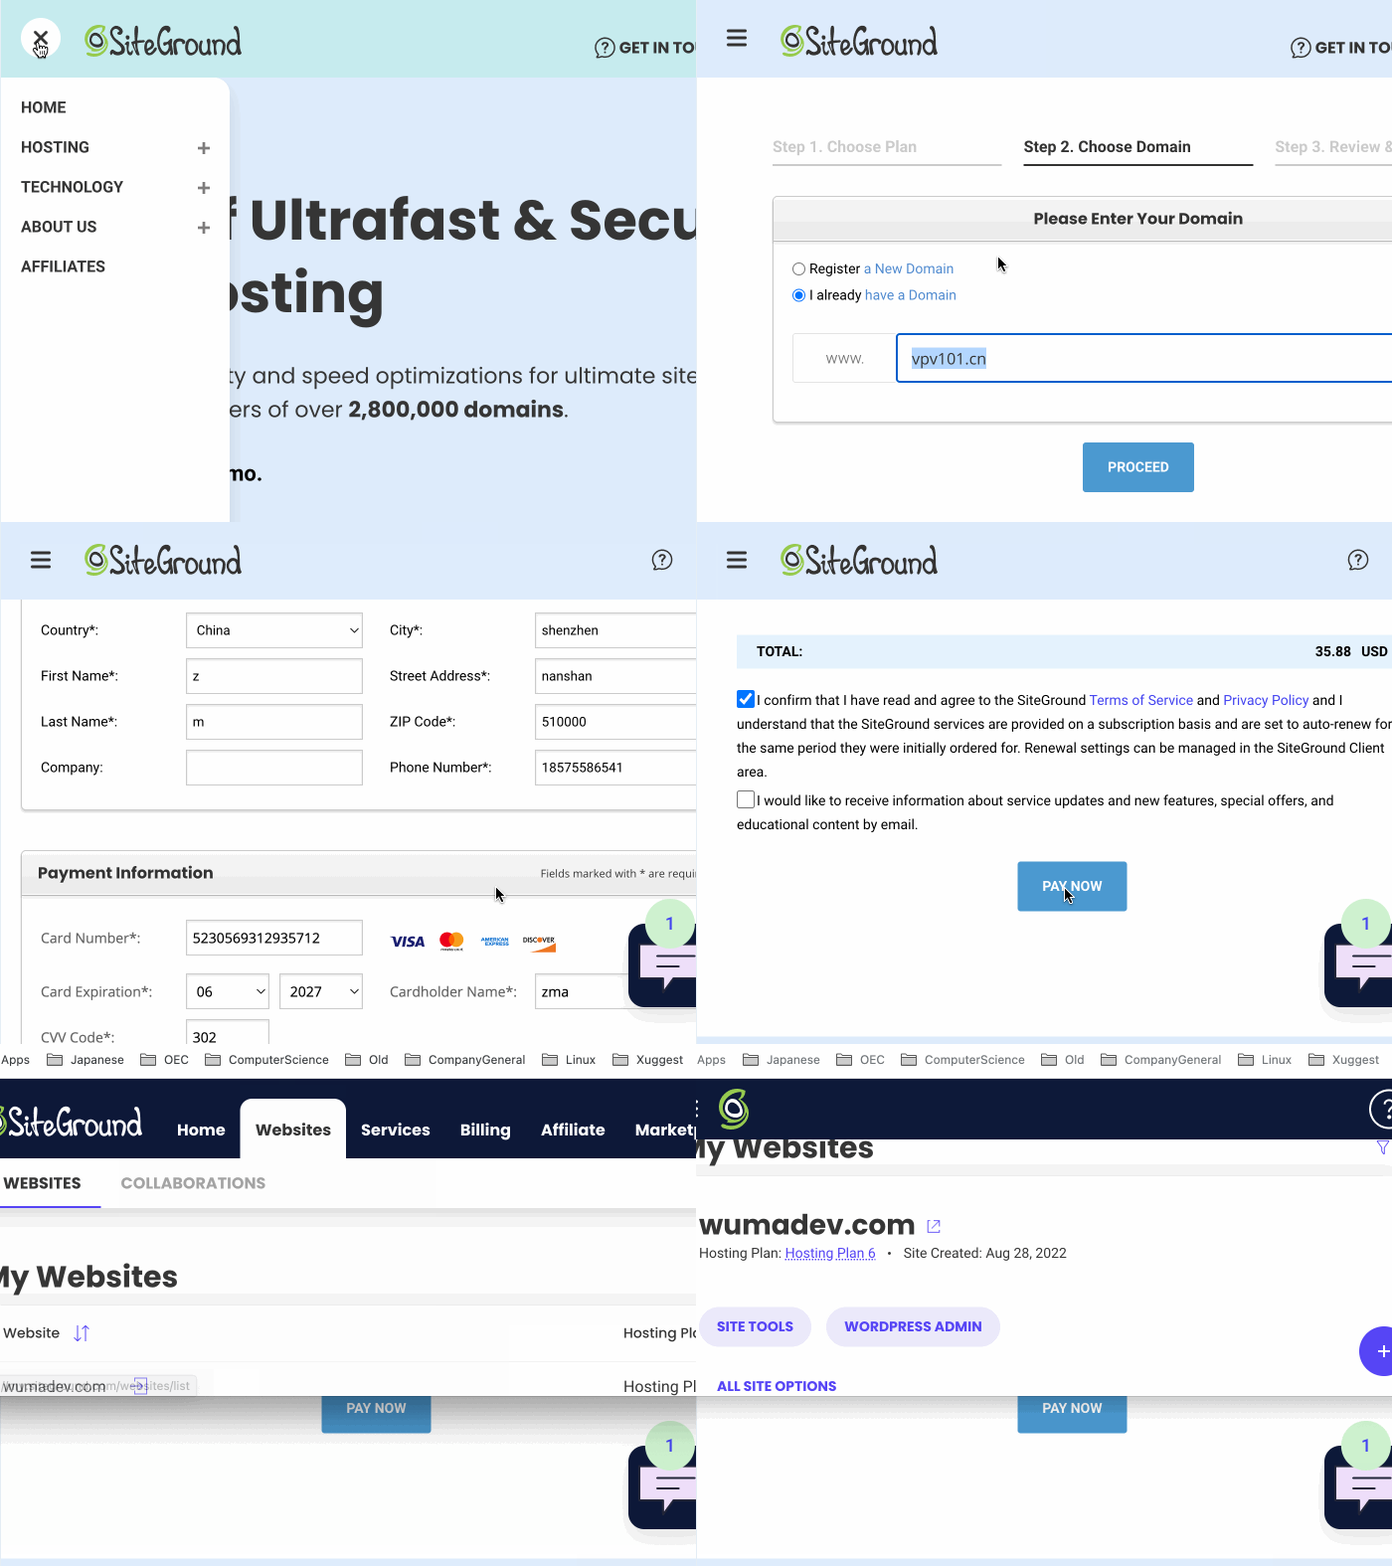
After the payment is completed, an initialization interface will be generated, requiring you to enter your own WordPress administrator account and password , which you must remember.
If you forget your administrator account passwordYou can reset your administrator account password at any time in Siteground’s site tool, so don’t worry.×Turn off the alarm
After the purchase is completed, you can find this website in the websites list in your siteground background.
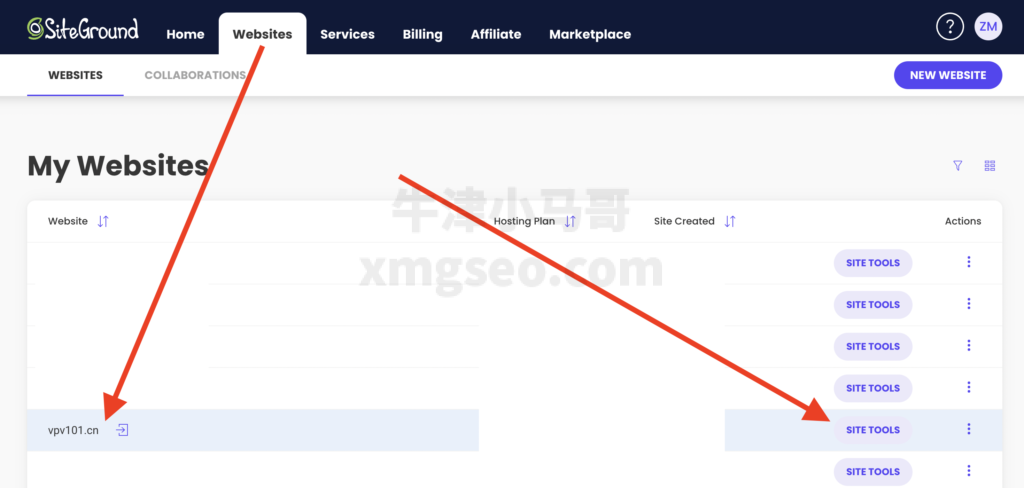
Step 3: Modify the domain name DNS
Next, we go into Siteground’s website tool list and find our server DNS.
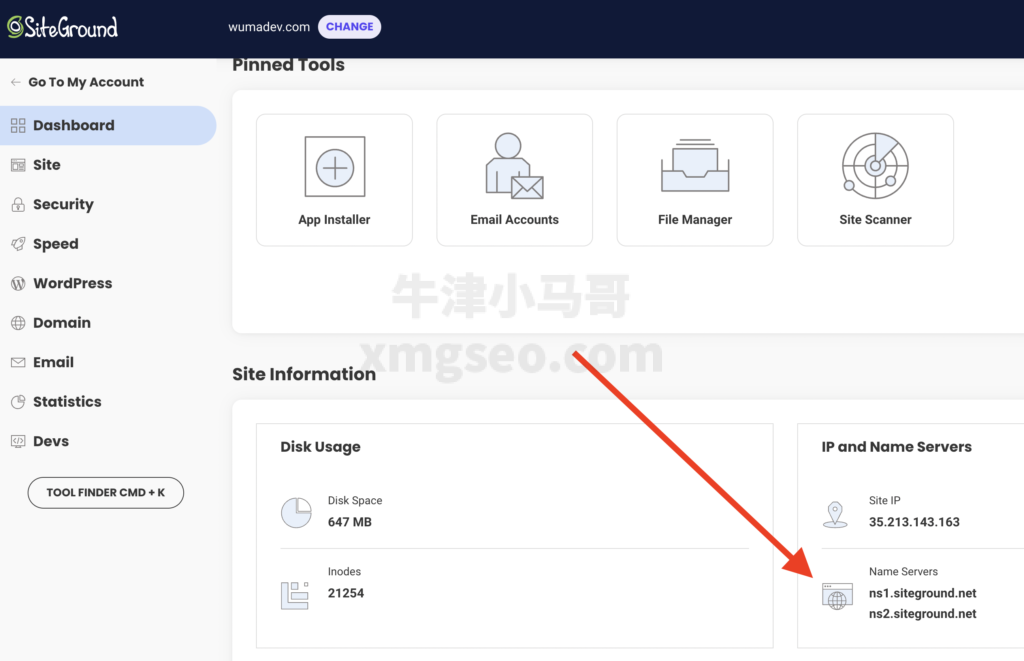
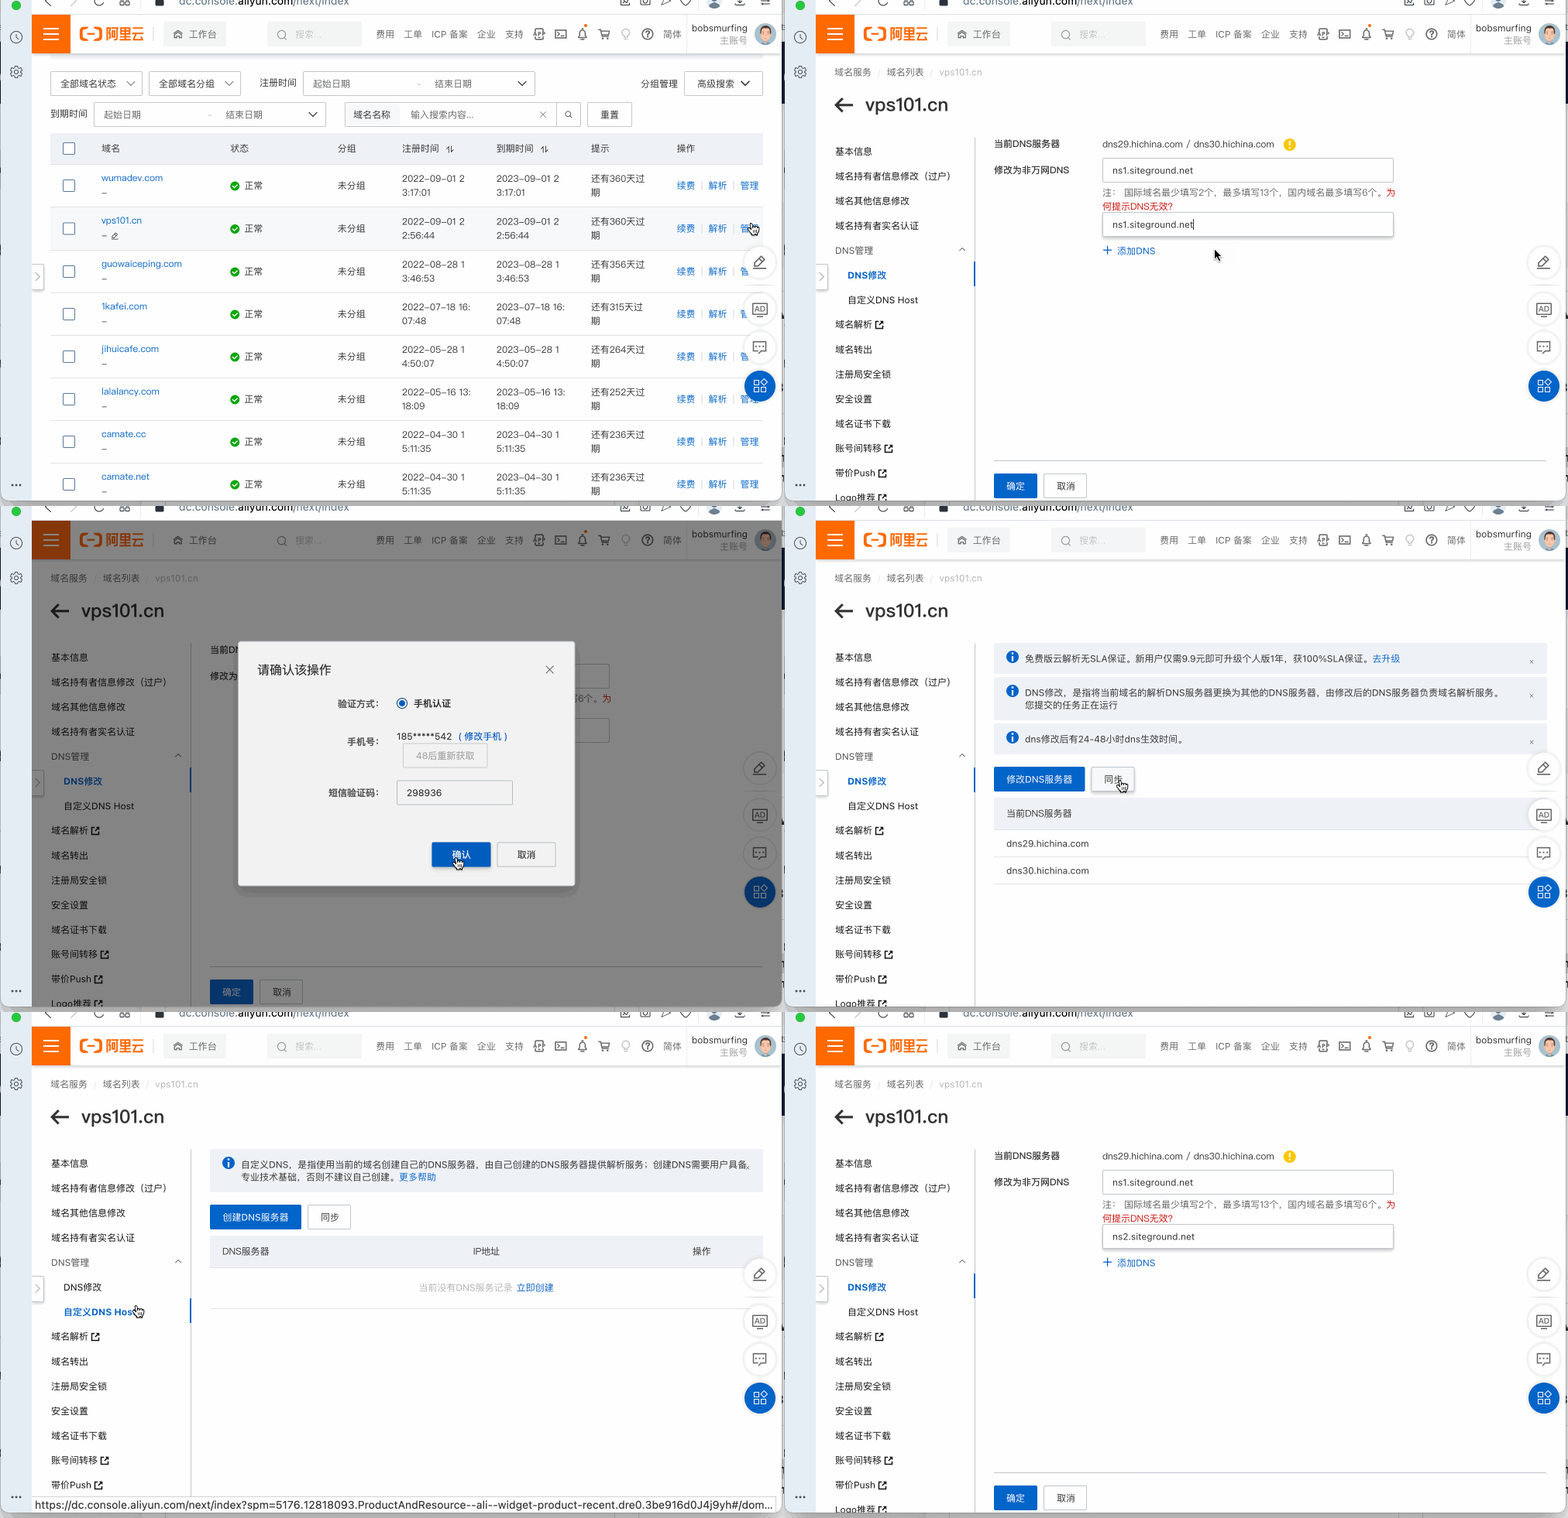
Then, in the domain name console in Alibaba Cloud, I changed the DNS server of my vps101.cn from the Alibaba Cloud default to Siteground’s DNS, as shown in the figure below (Alibaba Cloud reported an error when I made the change, but you shouldn’t be so unlucky to encounter the same situation, so I later changed to jihuicafe.com ).
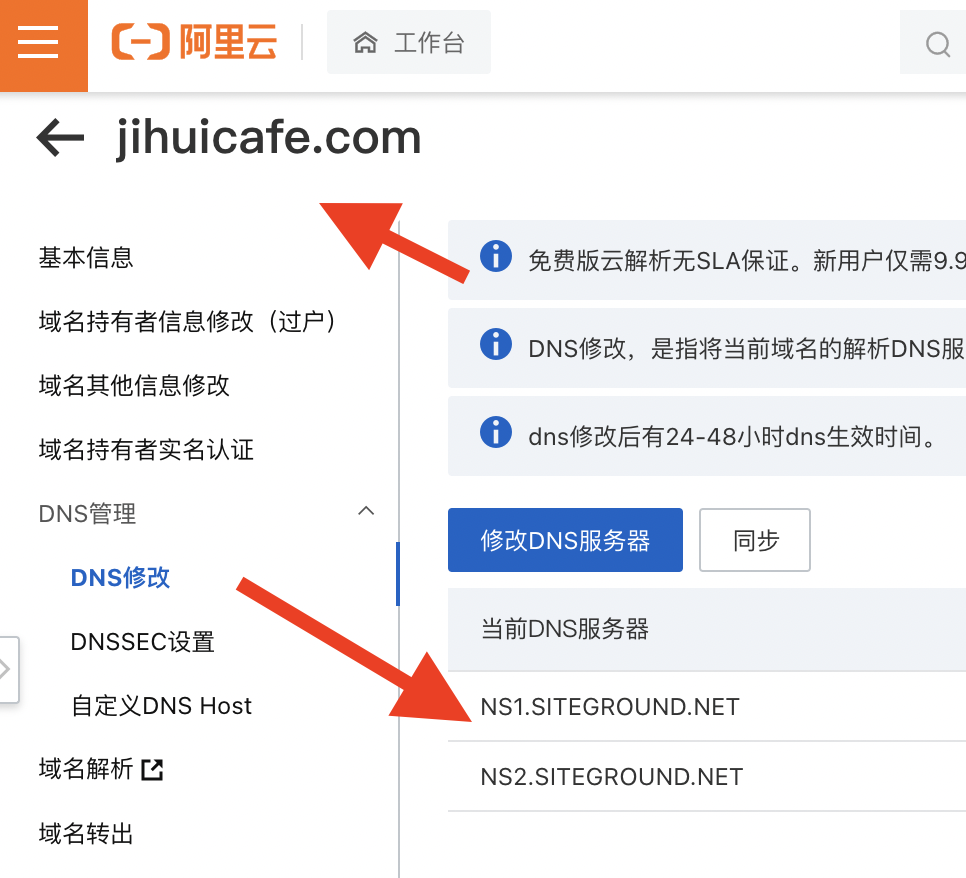
After the modification is completed, it should be the same as the picture below, which is case insensitive. Please note that I changed the domain name to jihuicafe.com for demonstration.
If you don’t know how to modify DNS, you can read my domain name tutorial , which comprehensively explains domain name registration and DNS modification issues.
SEO TUTORIALS
How to buy domain names, modify DNS and domain name resolution on Alibaba Cloud
This tutorial will teach you how to purchase a domain name on Alibaba Cloud.
Step 4: Generate SSL certificate
After the modification is completed, we will generate SSL next. Now we are still in the site tool background of siteground, you need to find the ssl tool.
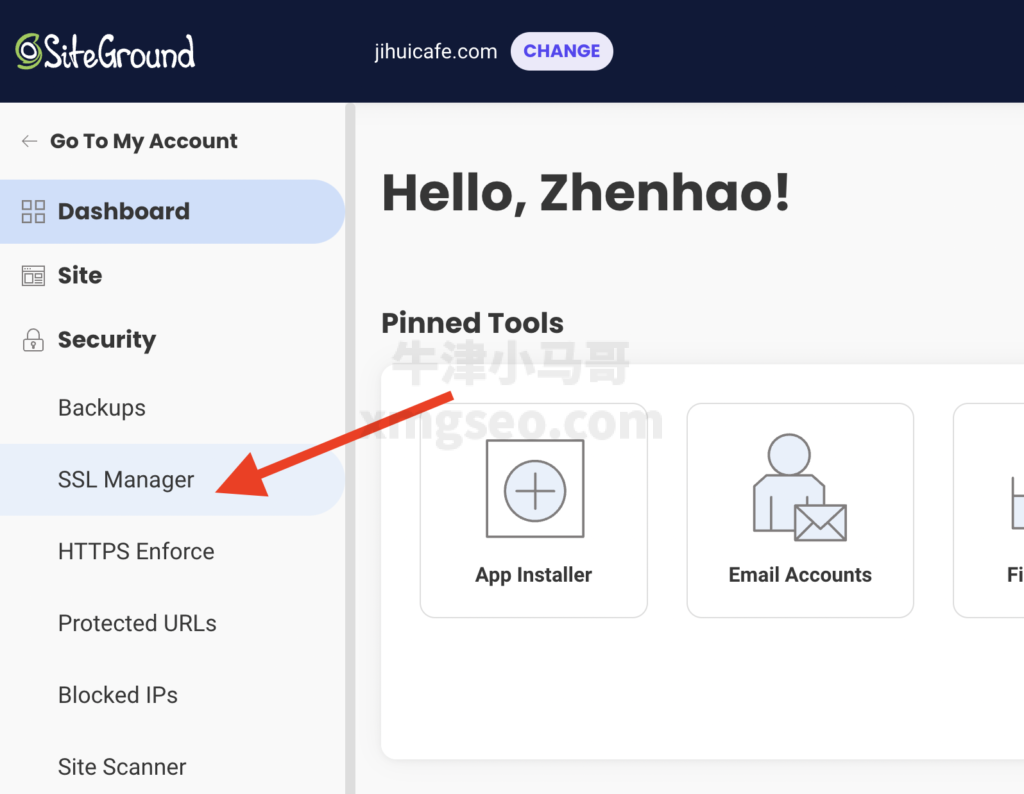
You need to wait for the DNS modification to take effect before you can generate SSL. Your operation process should be the same as the picture below. The picture below is what I completed in the site tool of jihuicafe.com (that is, the background of siteground).
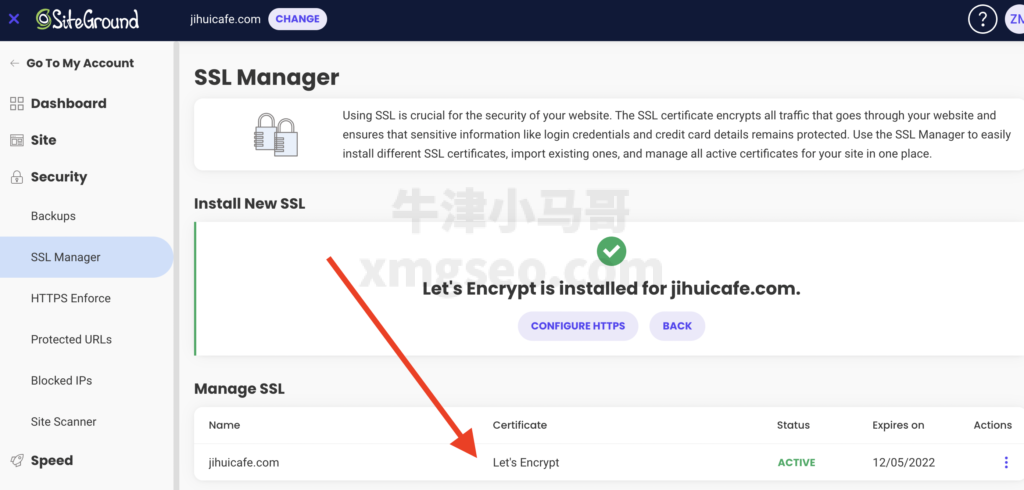
If you encounter the same error as mine when generating SSL, see the picture below. This means that the DNS modification of your Alibaba Cloud domain name has not taken effect . It may also be caused by the fact that your DNS is not set correctly. If it has not taken effect, you need to wait a few minutes or even an hour before trying again.

Step 5: Enter the WordPress administrator backend for the first time
Next, we open the administrator interface and enter https://domain name/wp-admin in the navigation bar . In my case, it is https://jihuicafe.com/wp-admin. Then it will let me enter the login interface, and we need to enter the account password.

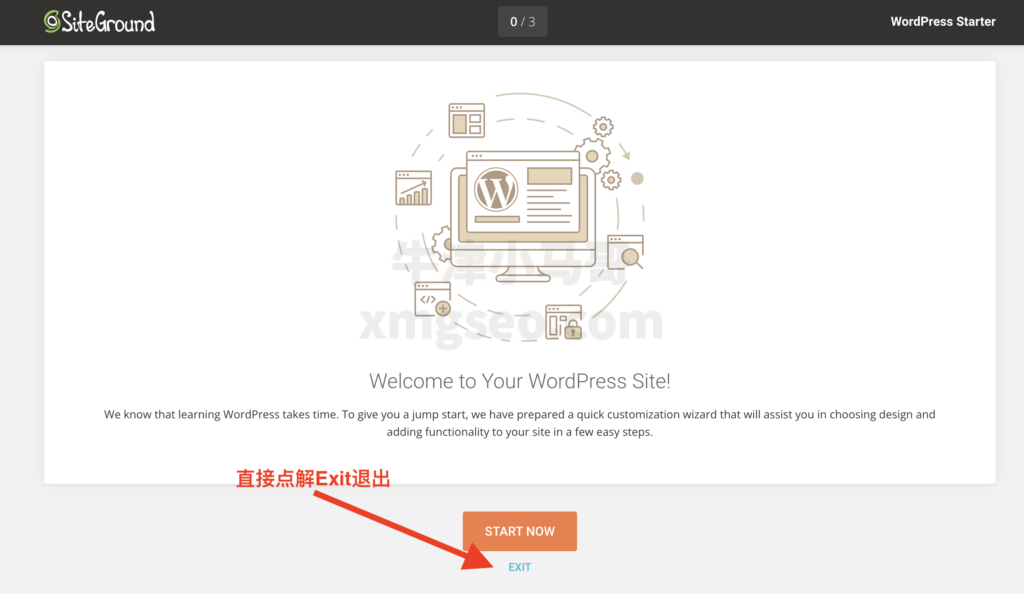
Next, we enter the initialization interface of the Siteground tool, and we can simply click exit to exit.
We have officially entered the backend of WordPress, and we can see the blank administrator backend.
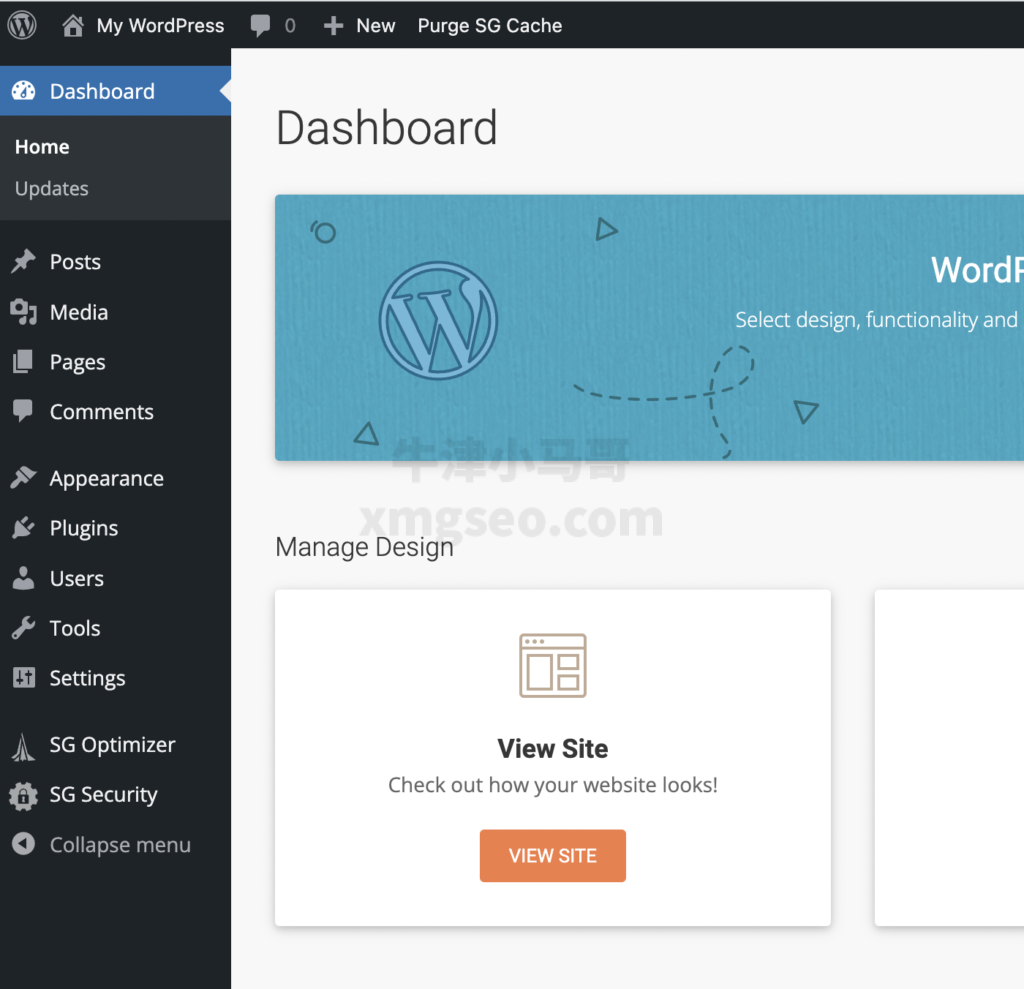
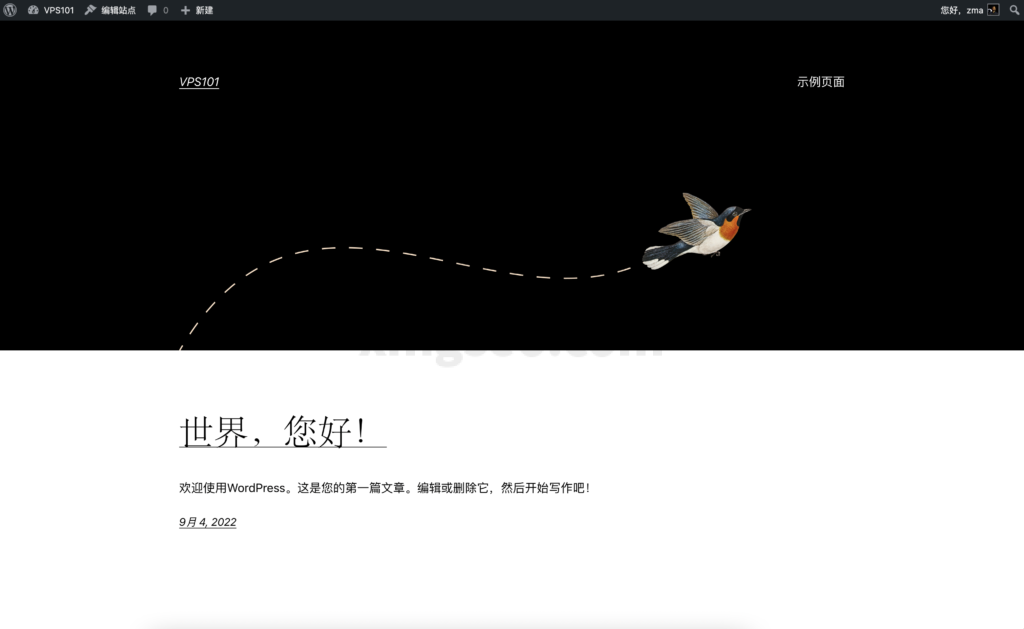
The homepage of our WordPress website now only has a welcome interface.
Step 6: Delete unnecessary plugins
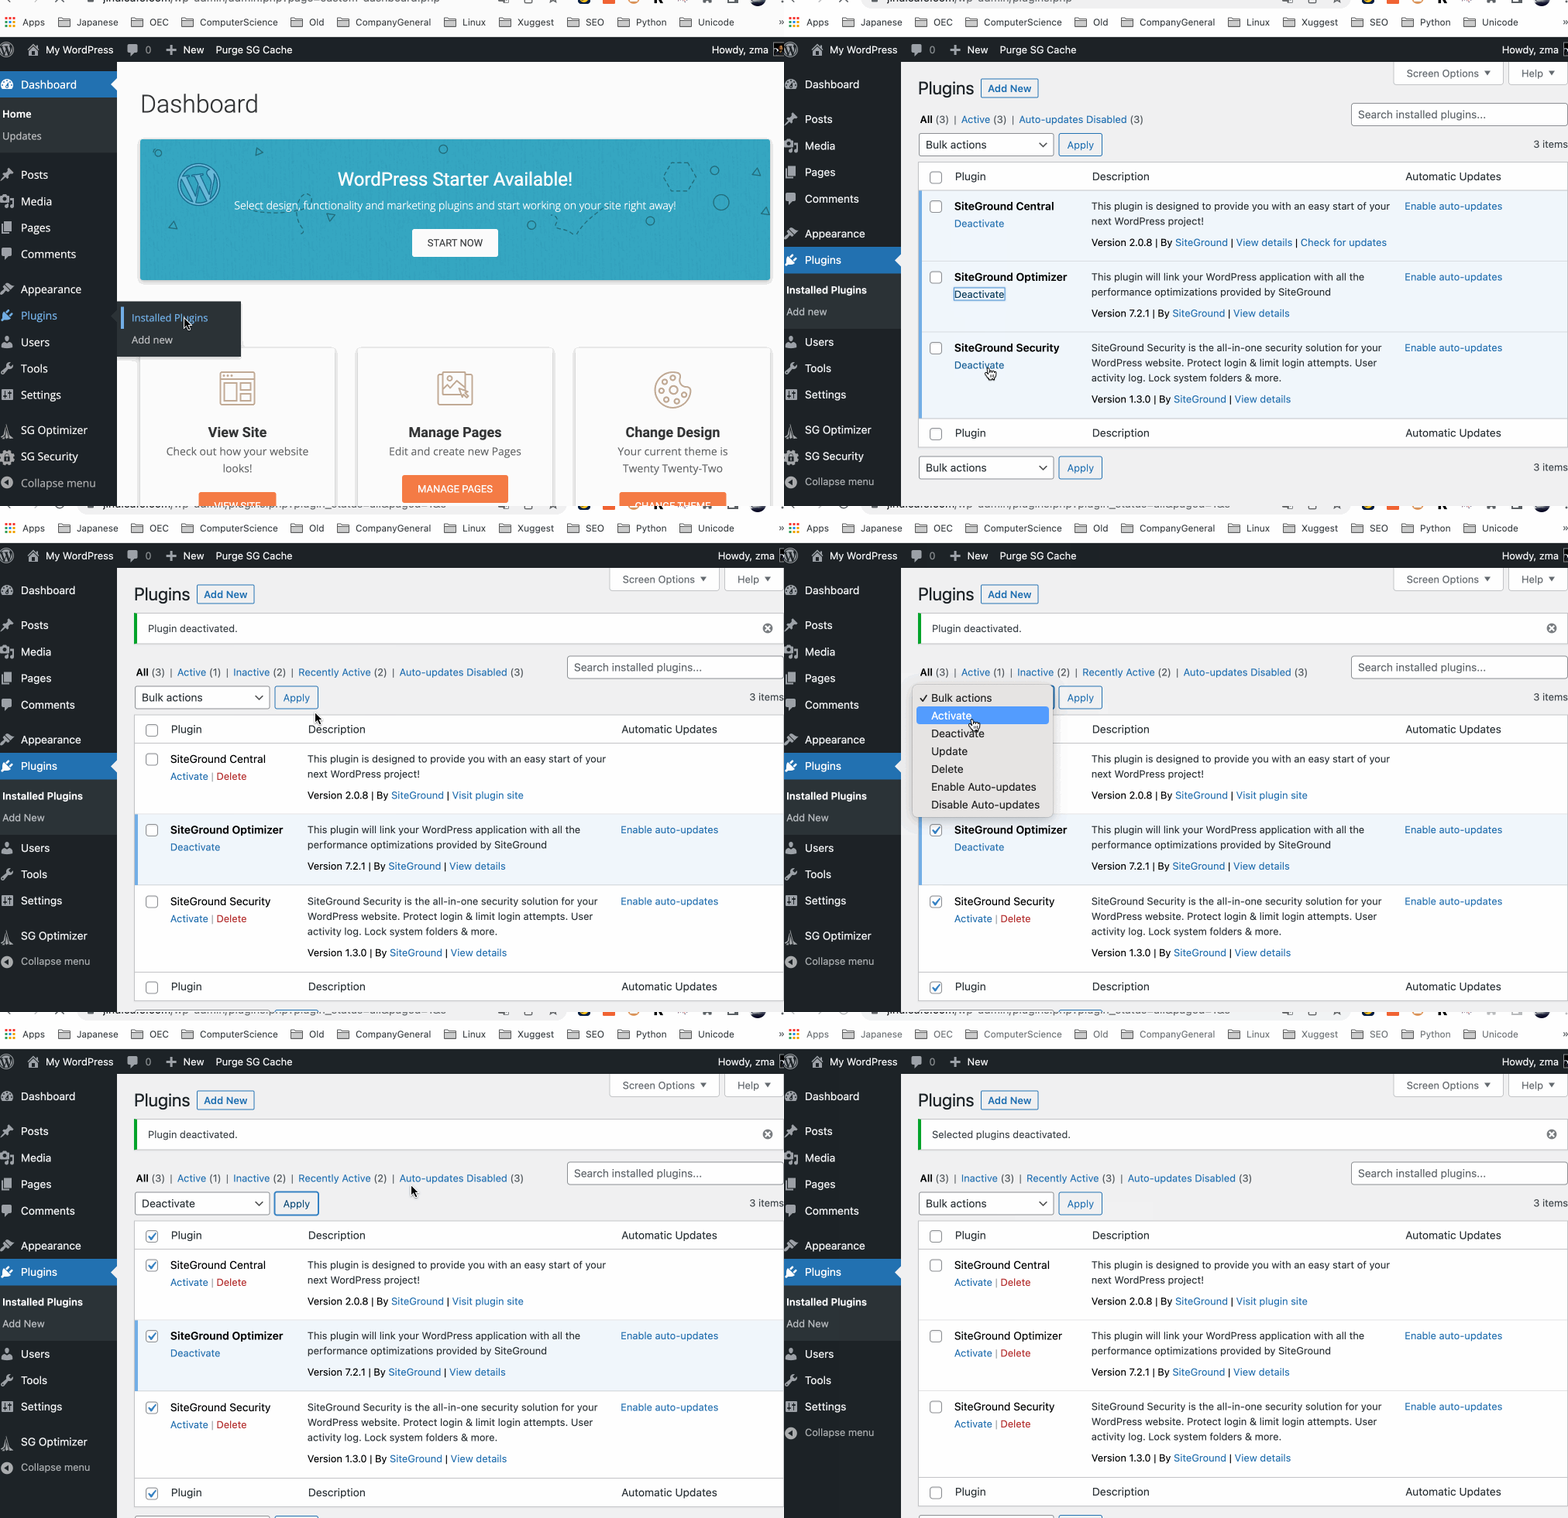
This is our first time installing WordPress, and we need to delete some unnecessary plugins that come with WordPress and Siteground by default, which we don’t need.
- SiteGround Security
- SiteGround Optimizer
- SiteGround Central
We go to the Plugins background and then simply close them all, as shown below.
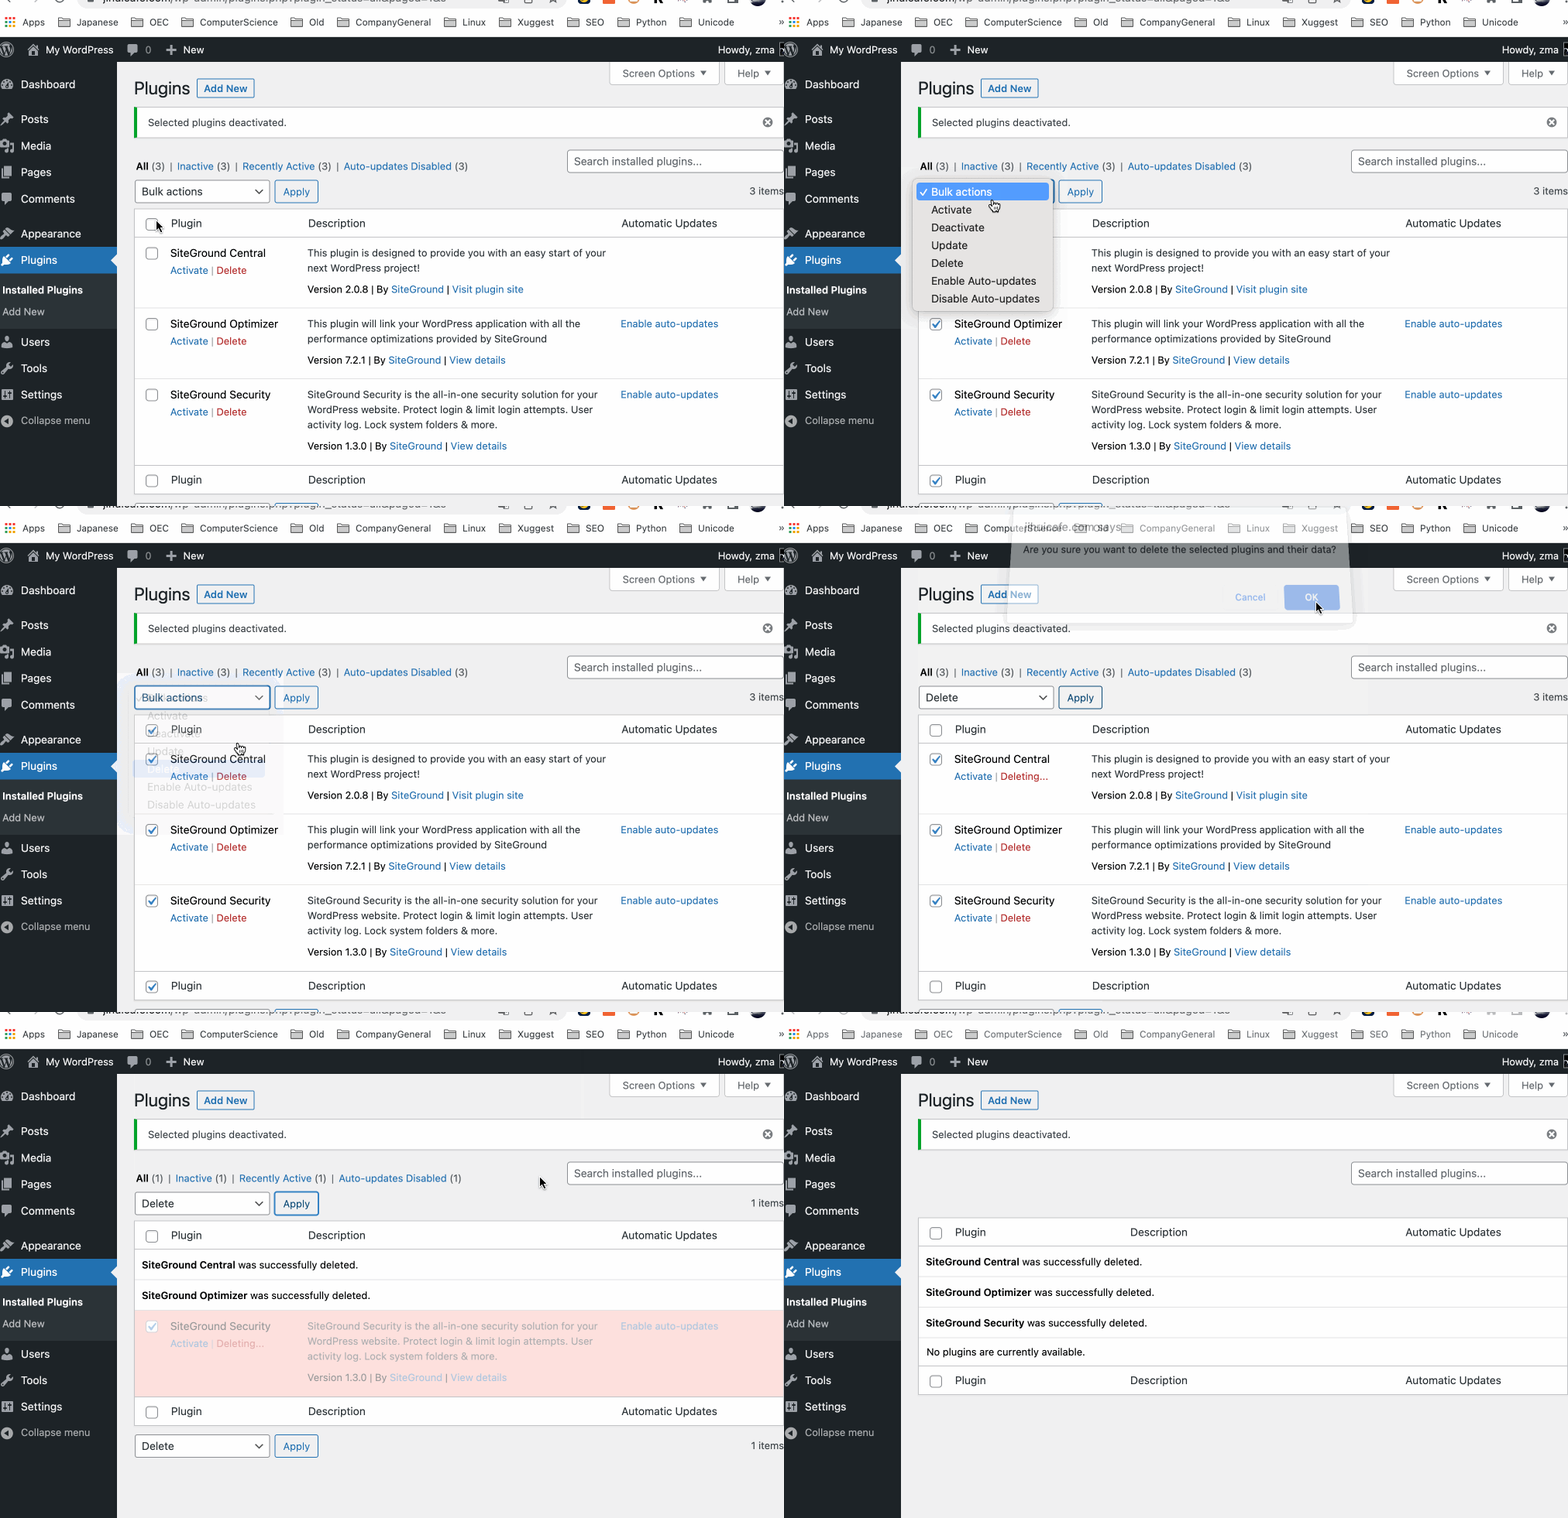
After the closure is successful, we can delete them in batches just to avoid being an eyesore.
Step 7: Install the theme
After WordPress is set up, my next step is to install the theme. I have recommended many fast WordPress themes suitable for SEO in my blog.

WORDPRESS
6 WordPress Themes Recommended – Fast and SEO Friendly
Here are 6 WordPress themes I like, all of which are good for SEO optimization and super fast loading.
You can choose your favorite themeThe tutorial here only teaches you how to download and upload the theme to WordPress. If you have your own favorite theme, you can choose it according to your preference.×Turn off the alarm
I will take the first recommended theme, Sakura , as an example. It is a very popular open source theme on Github, and its style is more youthful.

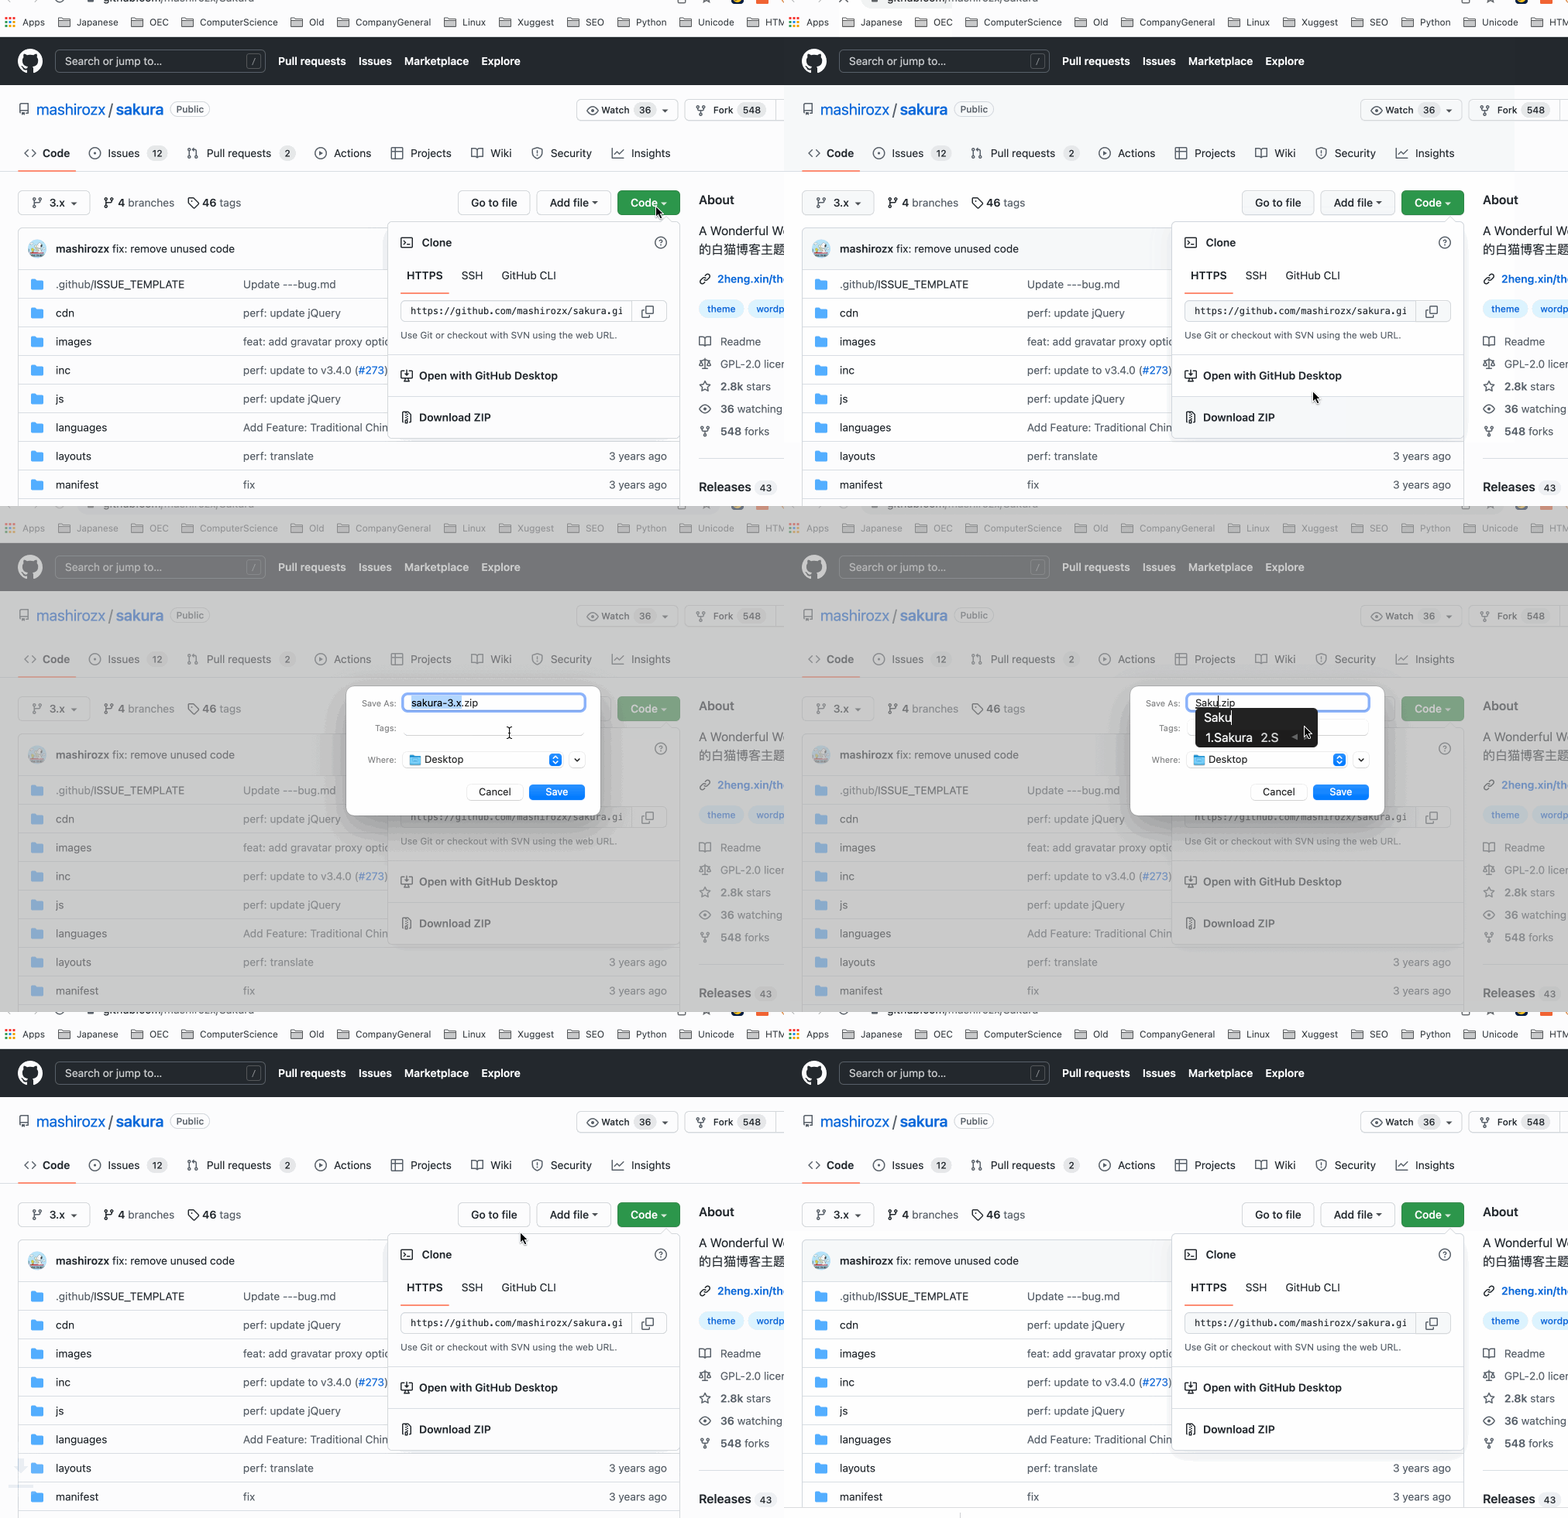
First, we download the theme package from github. It should be noted that the downloaded file name must be changed to Sakura.zip ; this way we can ensure the path of the theme file later. The whole process is shown in the figure below.
After downloading, we find the theme background in the background of WordPress, and then choose to upload the theme . After the theme is uploaded, be sure to remember to activate the theme so that it can be used normally.
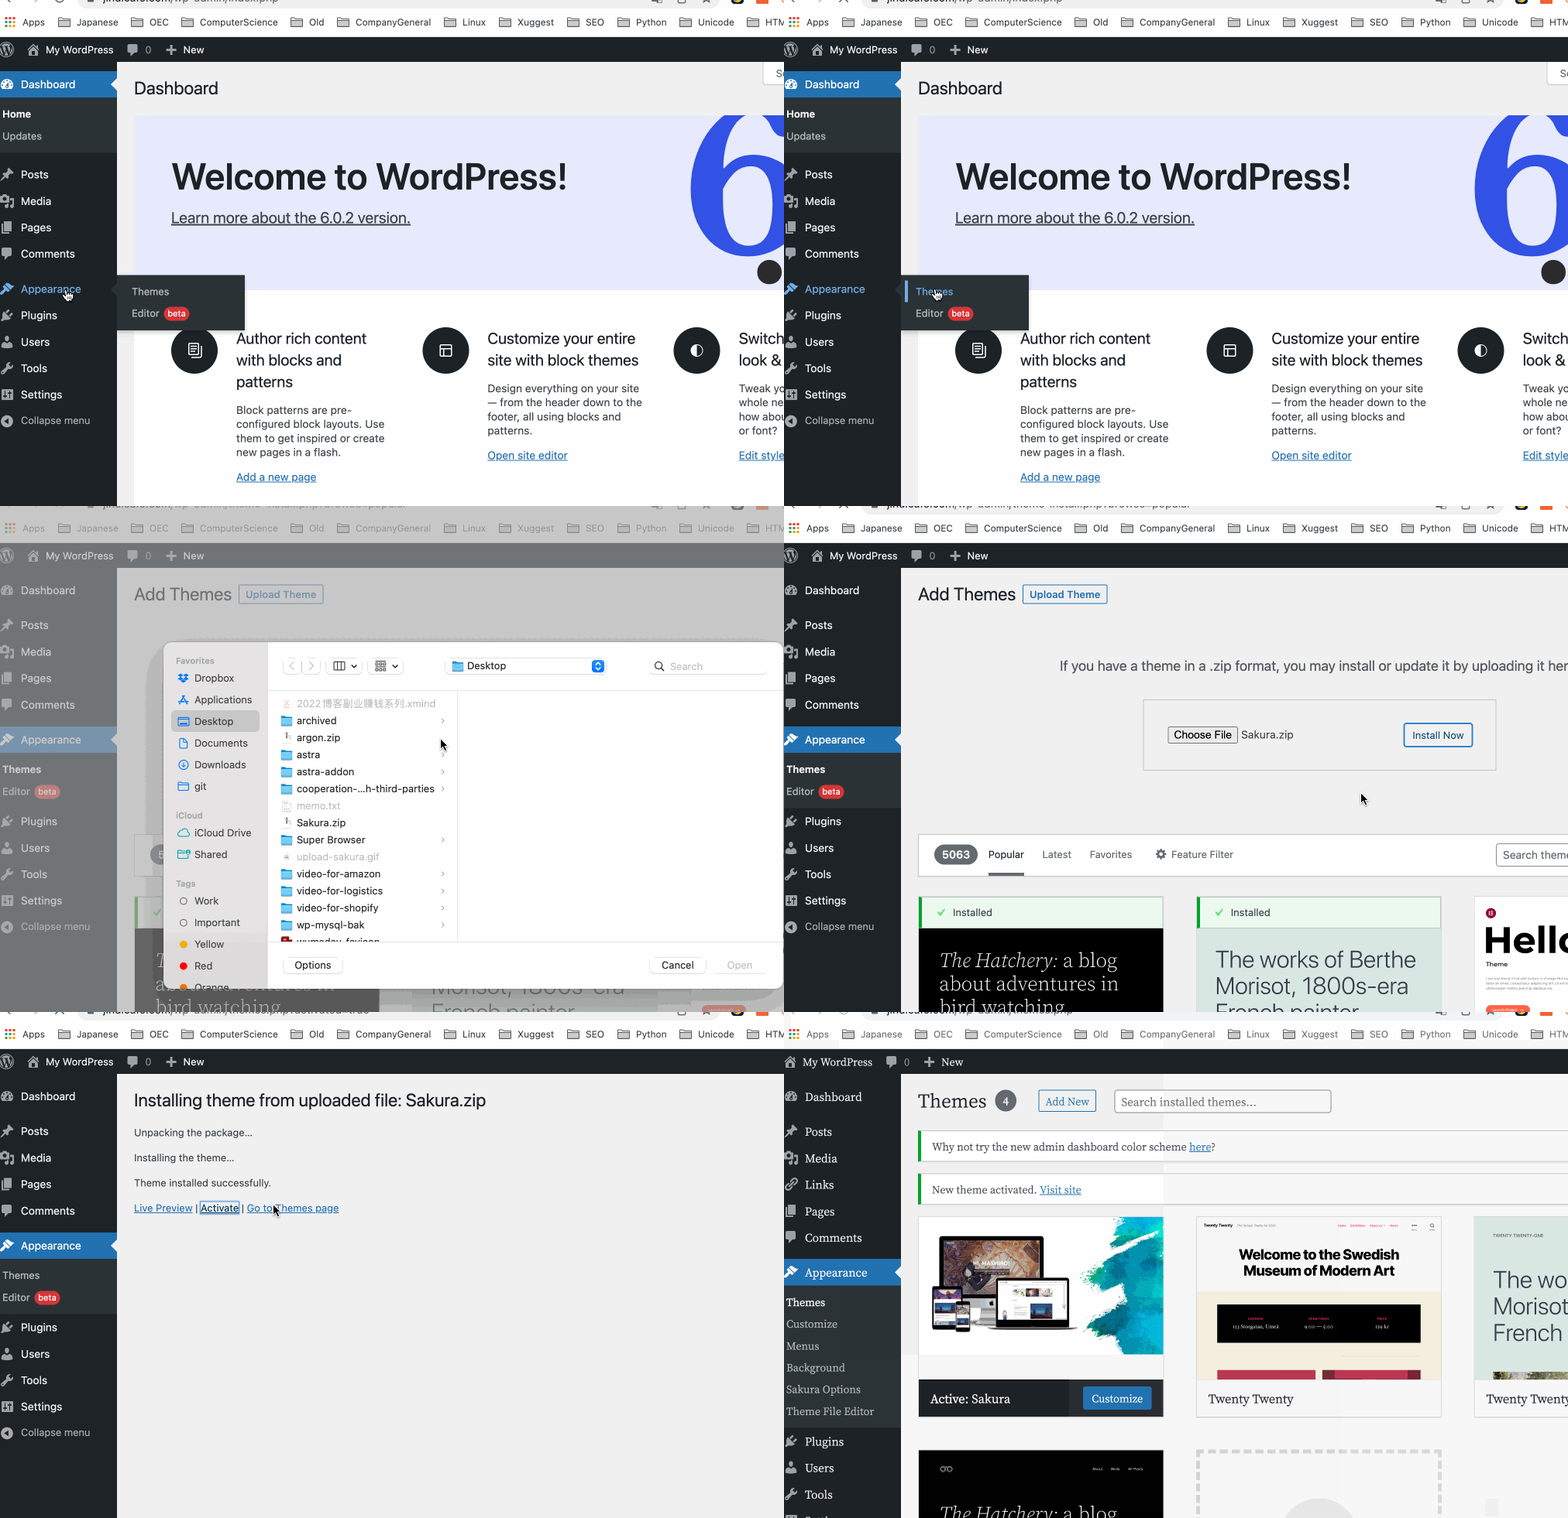
After activating the theme, I can see that my homepage has changed to a different one, as shown below. I must admit that this theme feels a bit fresh , and if you don’t like this kind of theme, I still advise you to use a foreign theme package like Astra , which I also use on my own website.

Step 8: Install SEO plugin
As a WordPress expert, installing a few necessary plugins for a new website is definitely a basic operation, and SEO is definitely indispensable. In order to facilitate our search optimization later, I would consider using Yoast or RankMath. You can choose one of the two here, and I would recommend RankMath more .
Next, I found the plugin area in the backend of my own website, searched for RankMath, and clicked directly to install and activate .
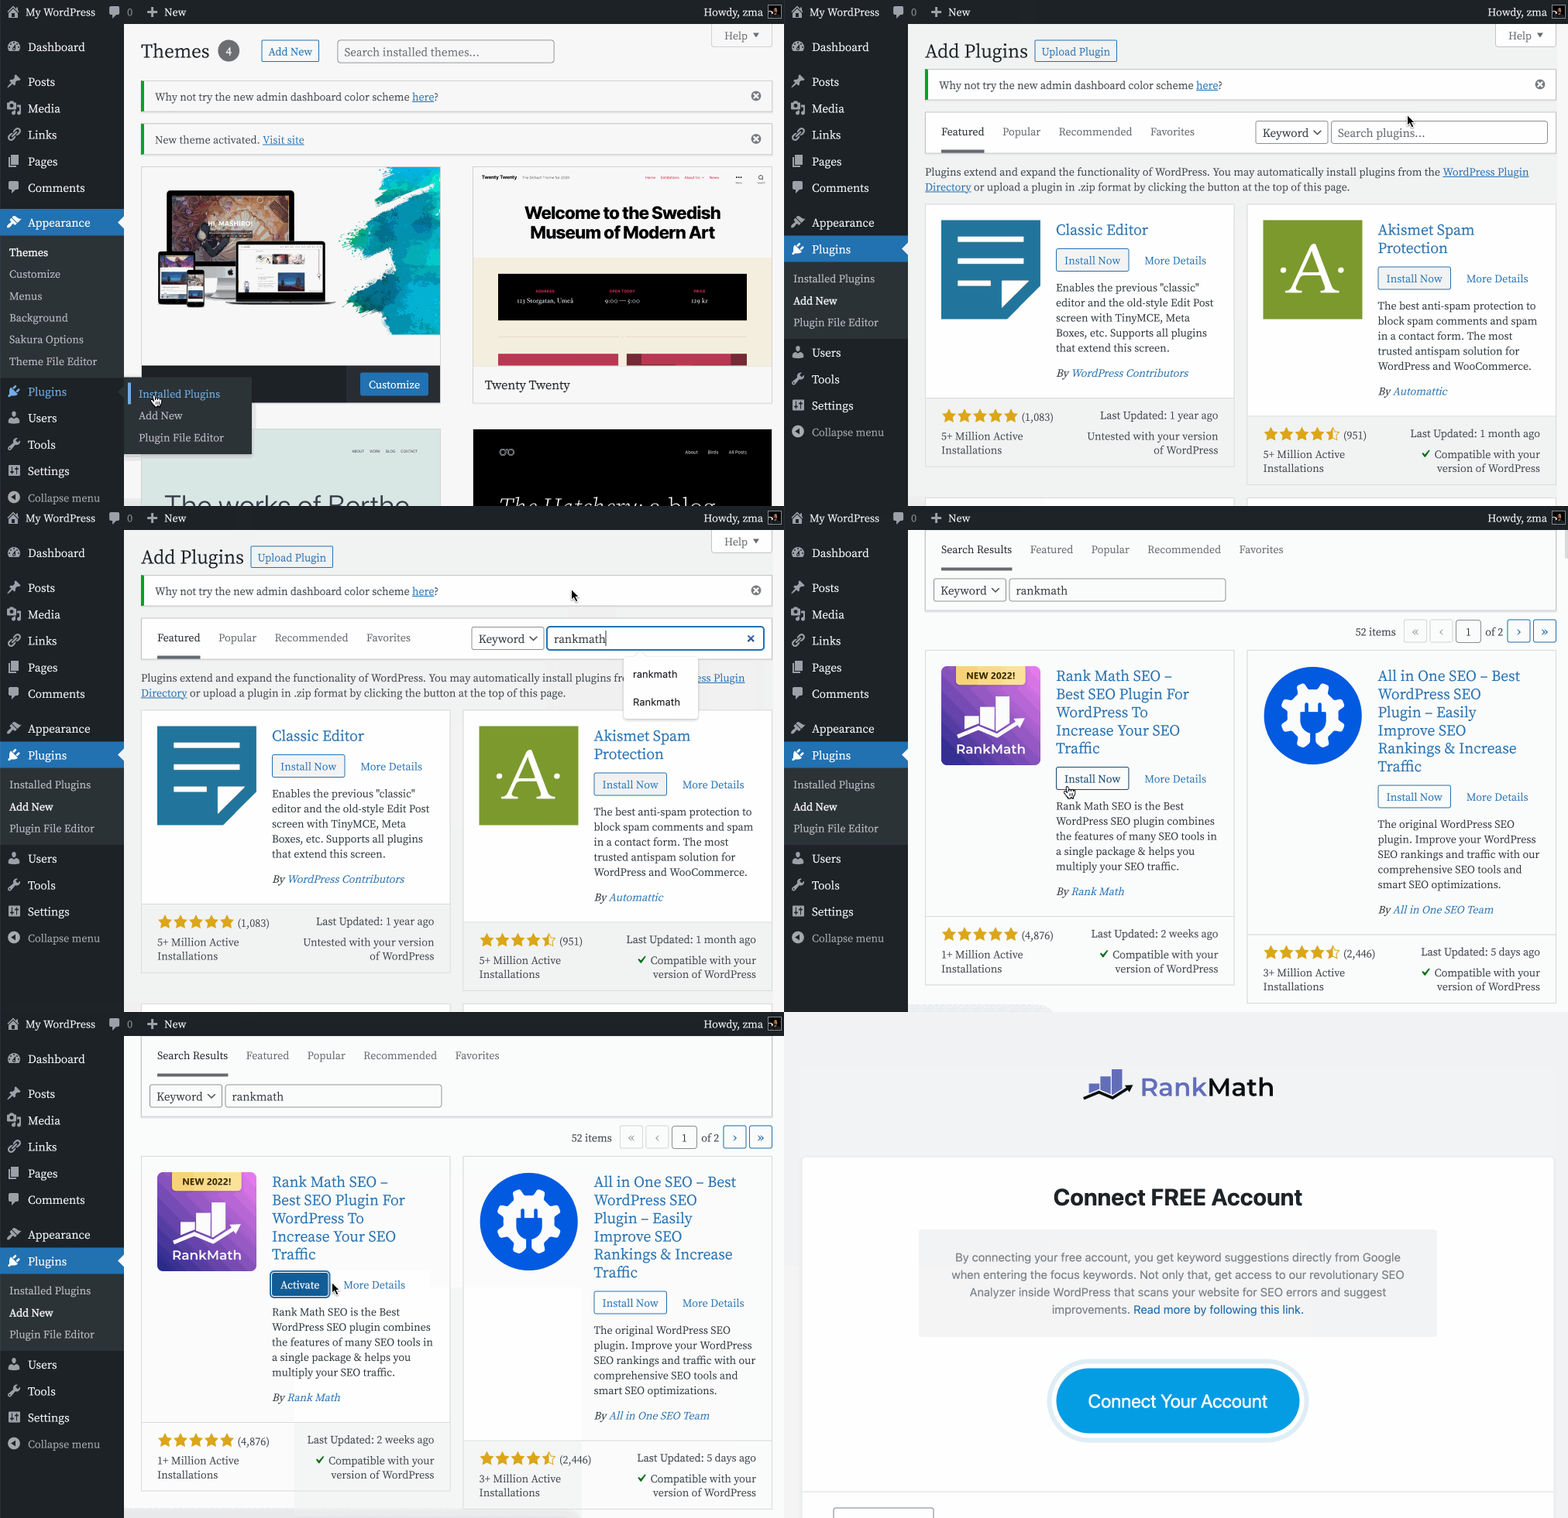
After the installation is complete, there will be a very quick initialization process. We can just click to accept all of them here; when Rankmath asks us to bind our account, we just click Skip .

Step 9: Install cache strategy and file compression plug-in
In WordPress, we have many plugins that can help optimize the speed of the website . I have also recommended a series of tools and methods in my blog, see the article below.
WORDPRESS
WordPress Speed Optimization Tutorial
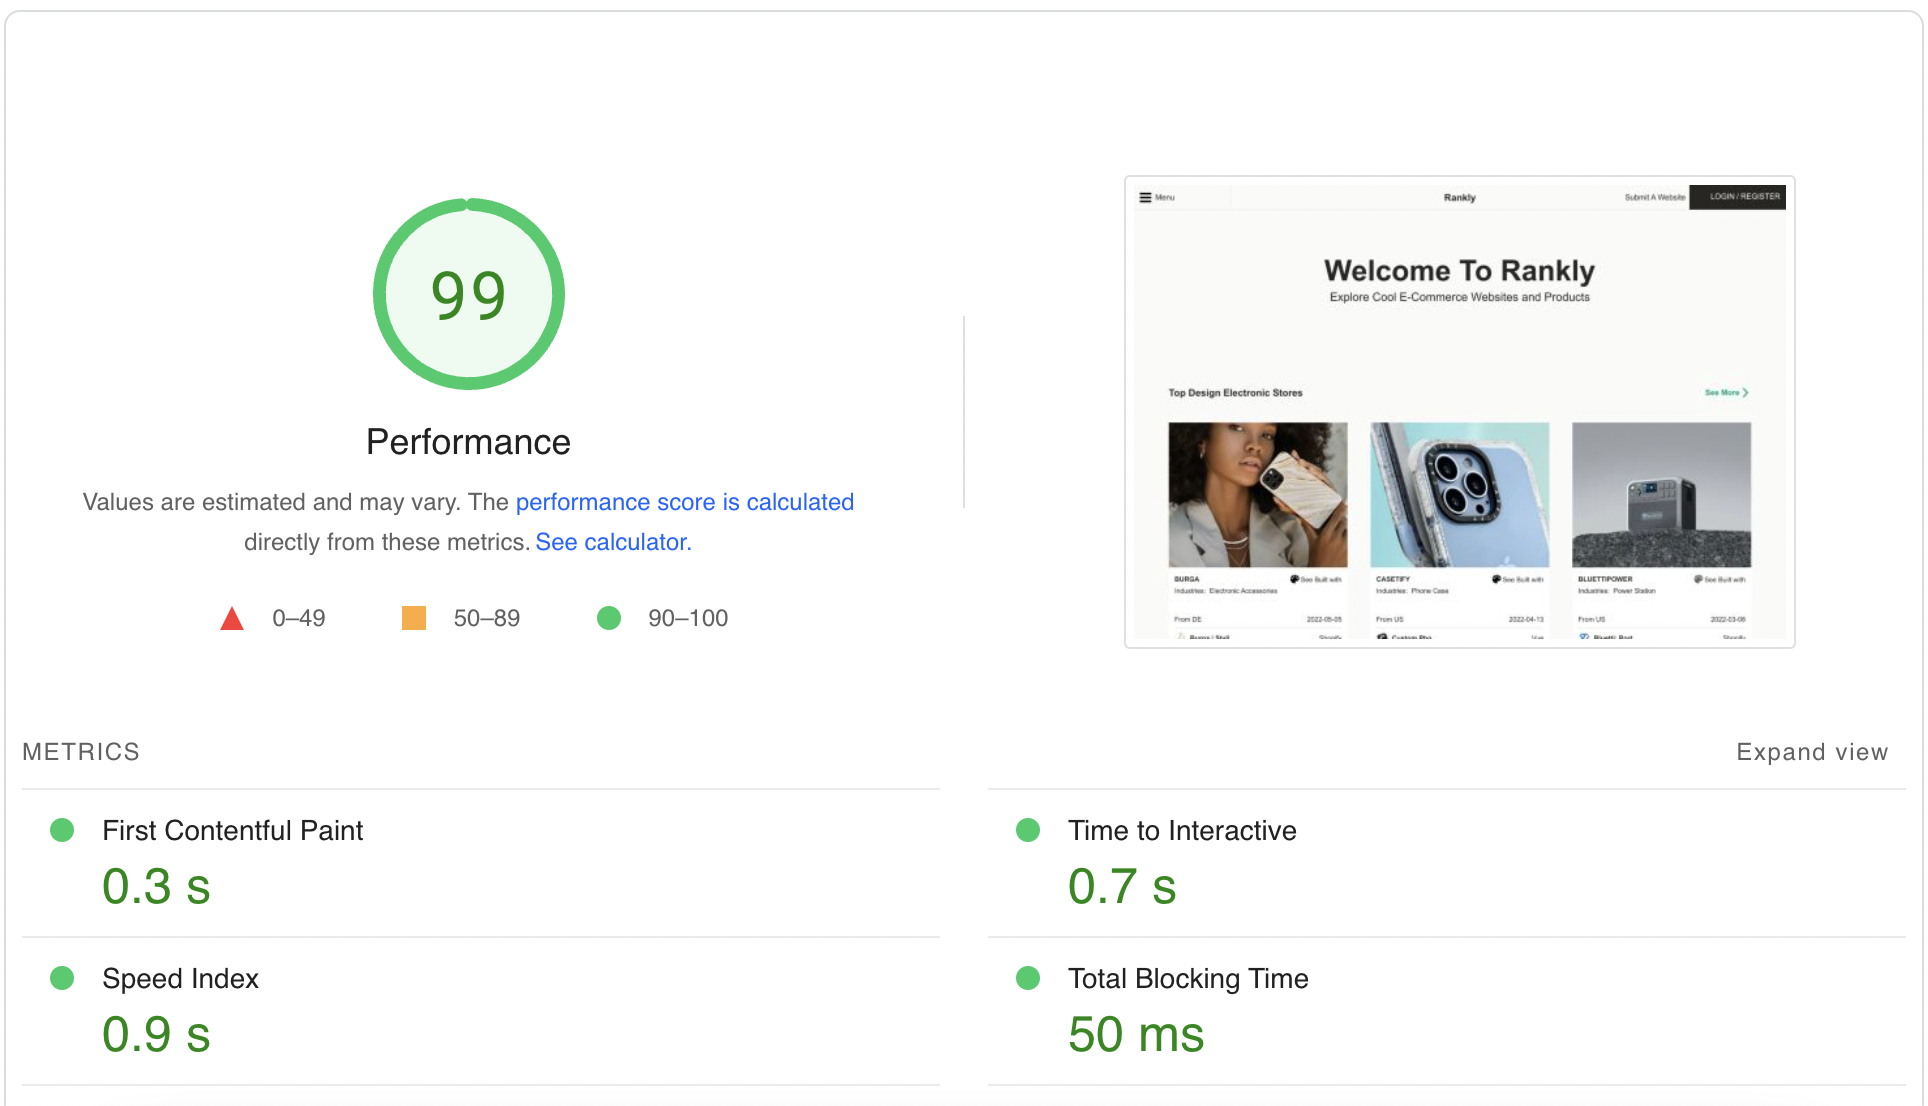
I believe many people want their websites and blogs to be faster, especially those who cannot stand the low scores of Google Pagespeed Insight.
Here, we want to install a Hummingbird, which will help us implement cache strategies and file optimization. First, we find hummingbird in the plugin market, and then install and activate it.
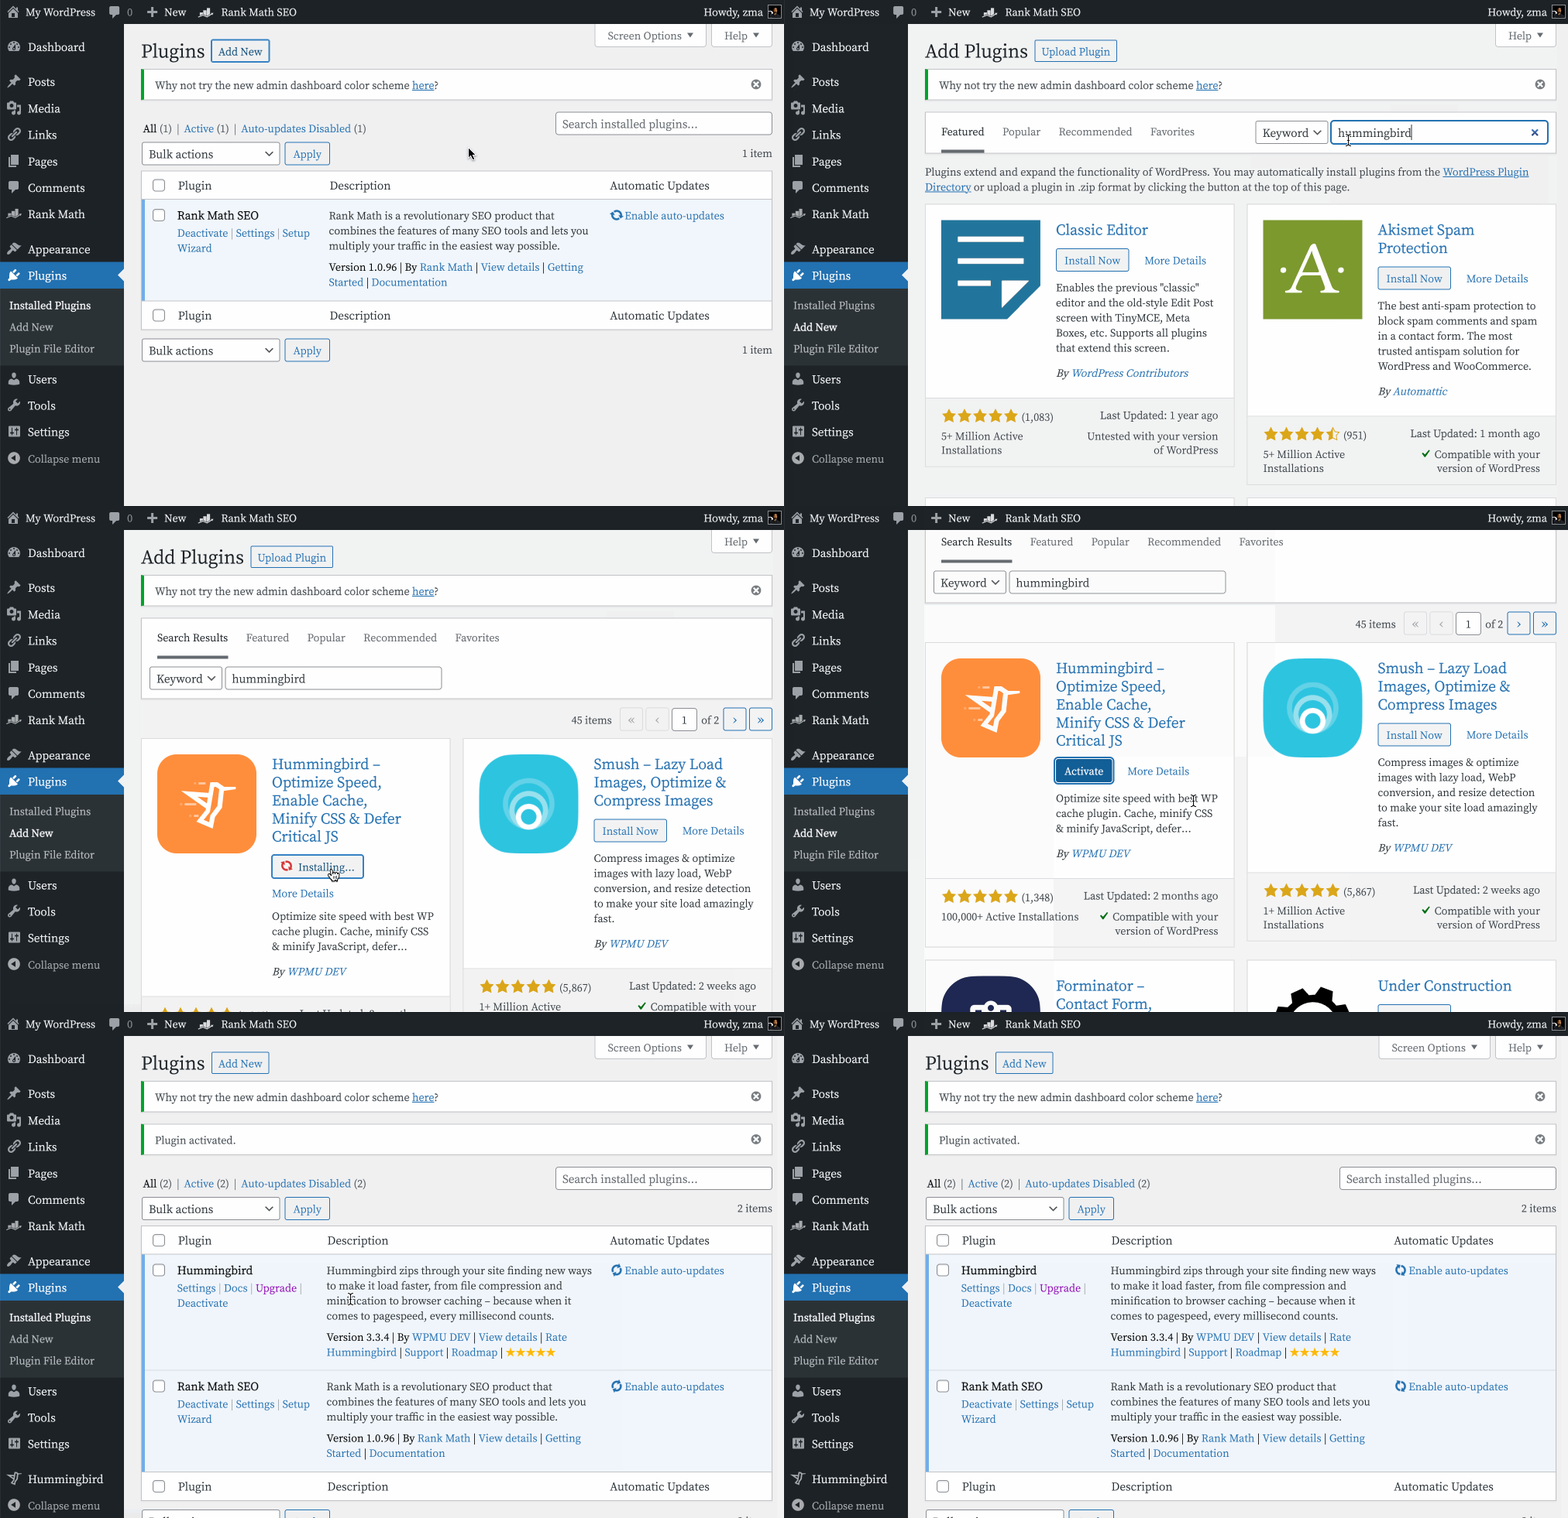
After the installation is complete, we need to enter the initialization interface and click Next.
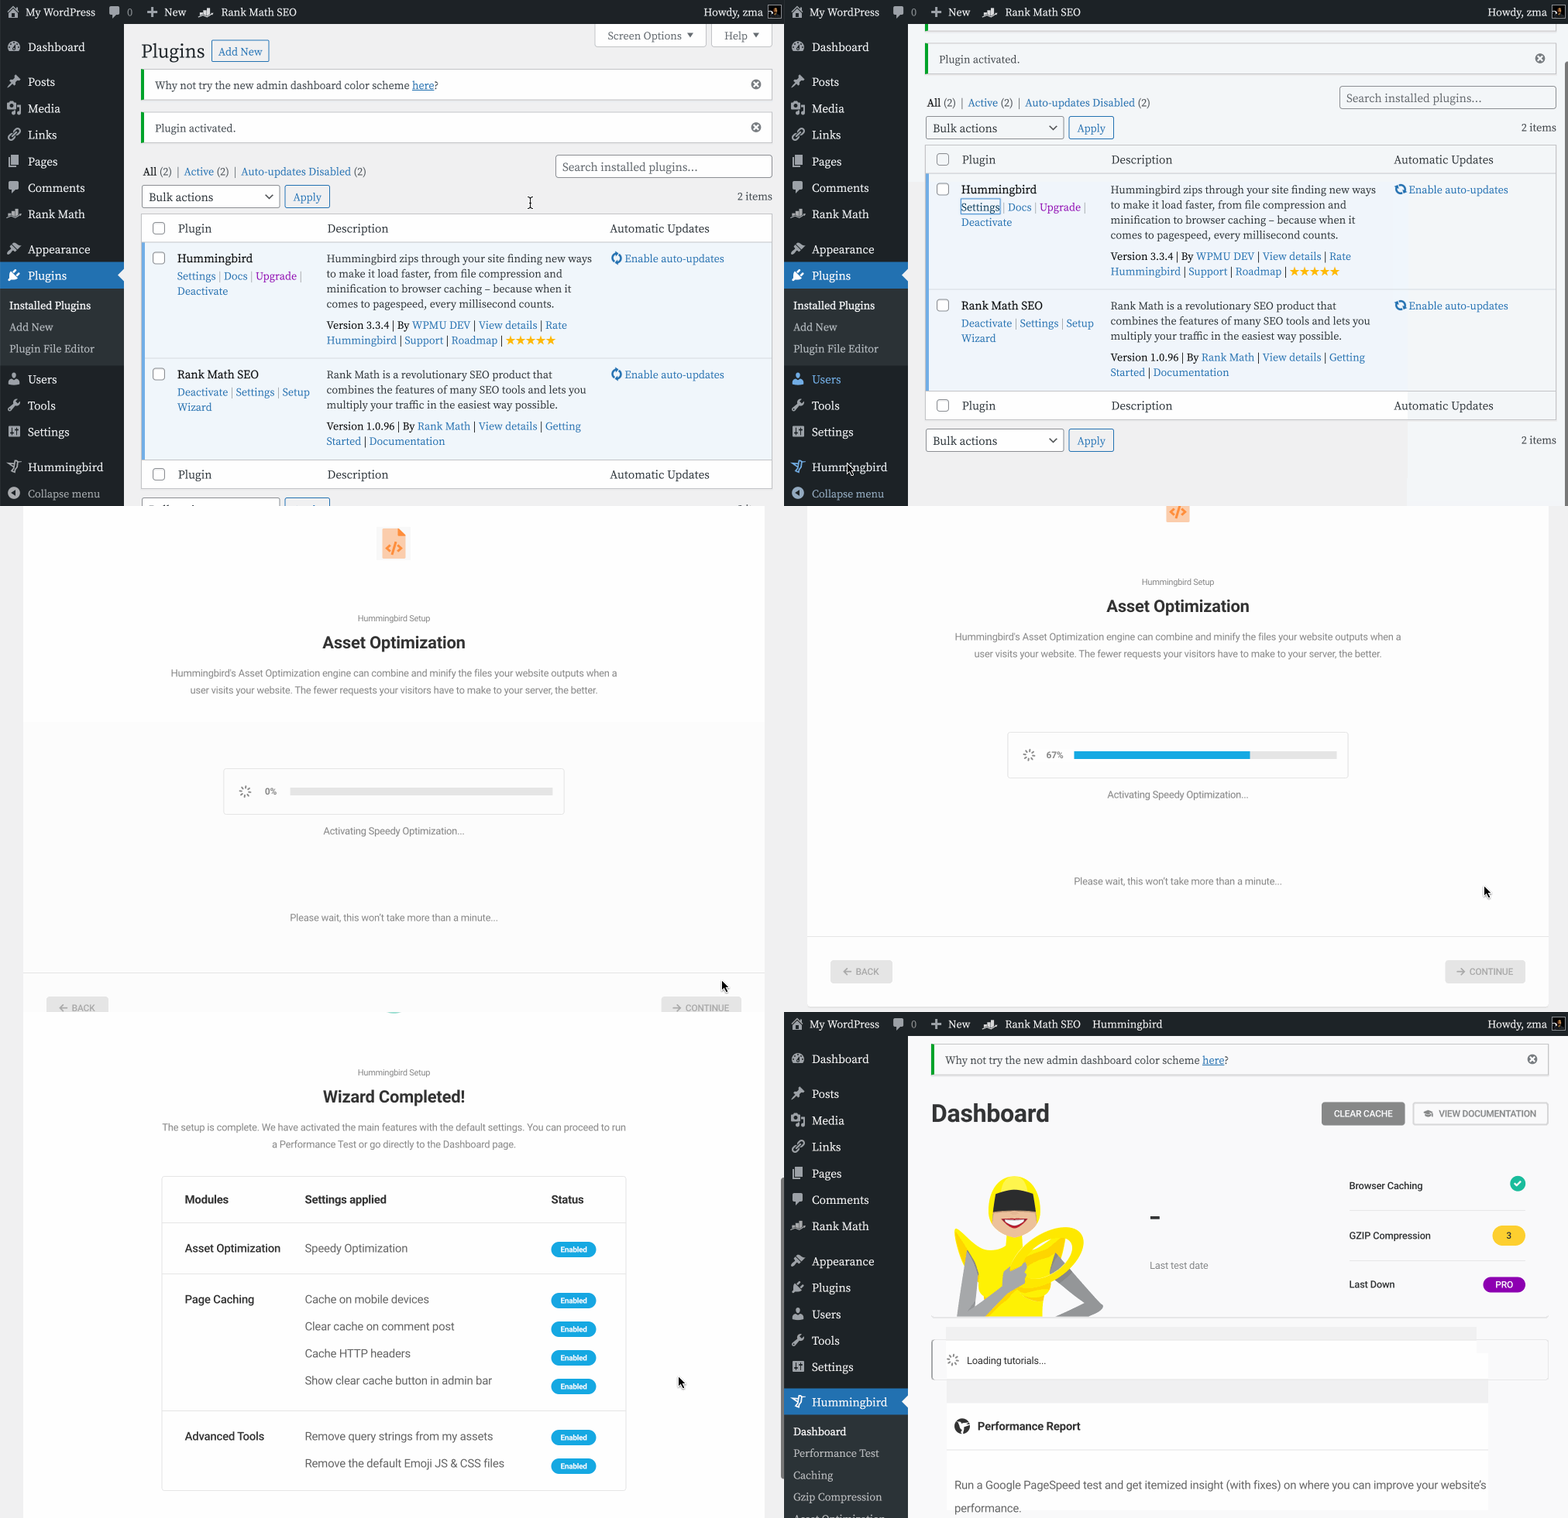
Step 10: Install the Next Gen Image Optimizer plugin
In order to automatically convert all the images we upload into Next gen format (such as webp), we need to use a third-party plug-in to achieve this. The purpose of doing this is to reduce the size of the image, which is beneficial to the speed optimization of our website, and the speed improvement effect is very significant .
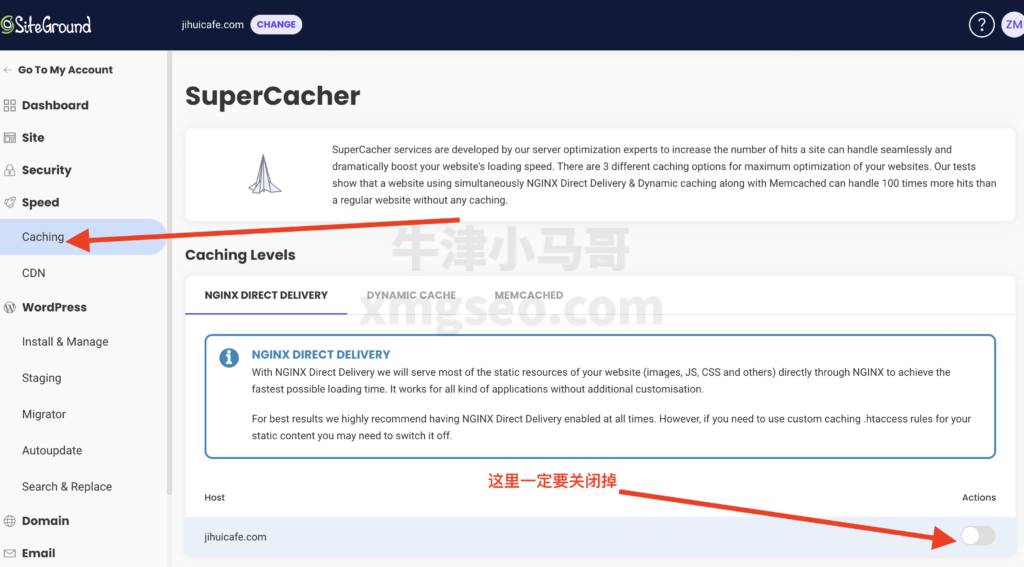
Before we start the installation, we need to turn off Siteground’s default caching policy. You need to find Cache in site tools of your website domain and click on it to turn it off.
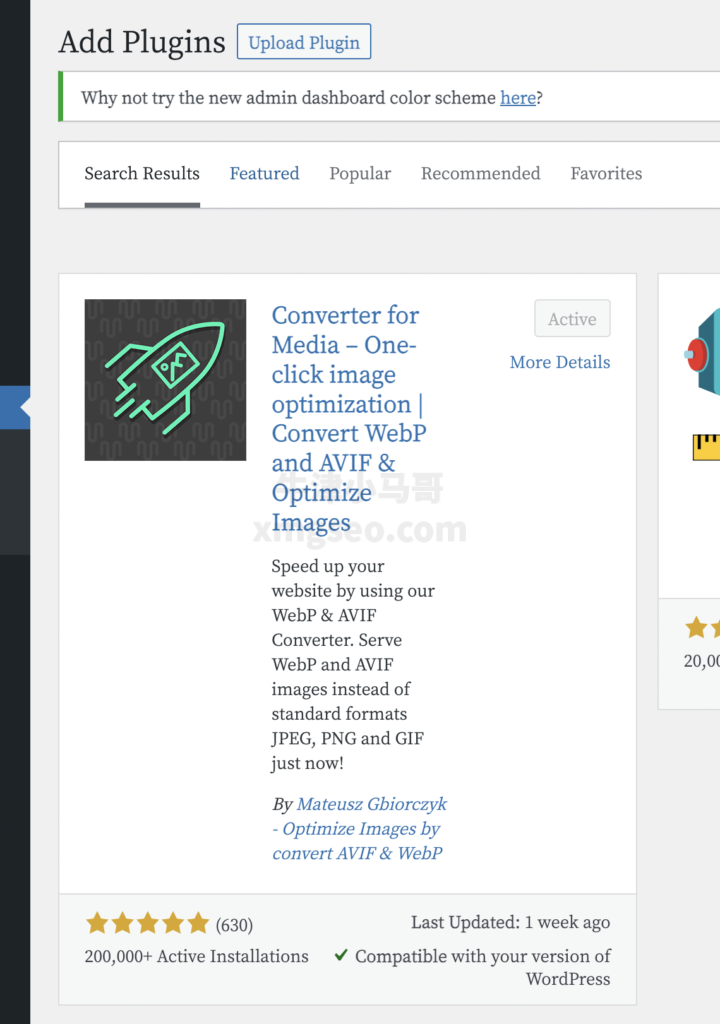
After closing, we install the webp plug-in, converter for media , in the WordPress background, as shown in the figure below. Just click to install and activate.
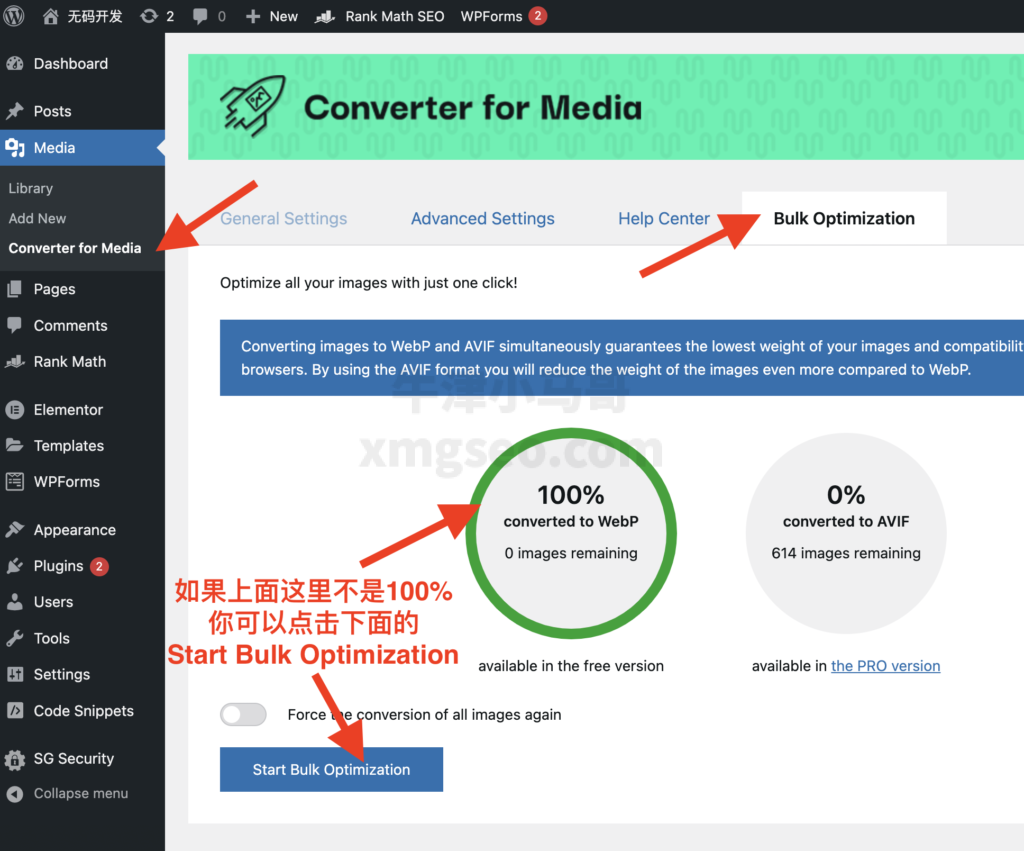
Next, you can find this plugin in the left column and find Converter for Media under Media . Then click it to view it. If you have followed the steps I provided above, you should not see the red Error word. You can click Start Buck Optimization when you open it for the first time .
